
[TIL] Spring Boot 프로젝트에 캐싱 적용하기

8/9 진행사항
✅ 알고리즘 5문제
✅ 인메모리 저장소 및 캐싱 전략 1-5 ~ 2-4
✅ 챕터1 과제 캐싱 기능 구현
Spring Boot 프로젝트에 캐싱 적용하기
1. build.gradle
dependencies {
    implementation 'org.springframework.boot:spring-boot-starter-data-jpa'
    // 레디스 추가
    implementation 'org.springframework.boot:spring-boot-starter-data-redis'
    implementation 'org.springframework.boot:spring-boot-starter-web'
    compileOnly 'org.projectlombok:lombok'
    runtimeOnly 'com.h2database:h2'
    annotationProcessor 'org.projectlombok:lombok'
    testImplementation 'org.springframework.boot:spring-boot-starter-test'
    testRuntimeOnly 'org.junit.platform:junit-platform-launcher'
}
redis 의존성 추가하기
2. application.yml
spring:
  data:
    redis:
      host: localhost
      port: 6379
      username: default
      password: systempass
redis 설정추가하기
3. CacheConfig
@Configuration
@EnableCaching
public class CacheConfig {
    @Bean
    public RedisCacheManager cacheManager(
        RedisConnectionFactory redisConnectionFactory
    ){
        // 설정 구성을 먼저 진행한다.
        // Redis를 이용해서 Spring Cache를 사용할 때
        // Redis 관련 설정을 모아두는 클래스
        RedisCacheConfiguration configuration = RedisCacheConfiguration
                .defaultCacheConfig()
                // null을 캐싱하는지
                .disableCachingNullValues()
                // 기본 캐시 유지 시간 (Time To Live)
                .entryTtl(Duration.ofSeconds(60))
                // 캐시를 구분하는 접두사 설정
                .computePrefixWith(CacheKeyPrefix.simple())
                // 캐시에 저장할 값을 어떻게 직렬화 / 역직렬화 할것인지
                .serializeValuesWith(
                        RedisSerializationContext.SerializationPair.fromSerializer(RedisSerializer.java())
                );
        return RedisCacheManager
                .builder(redisConnectionFactory)
                .cacheDefaults(configuration)
                .build();
    }
}
@EnableCaching : 캐싱을 조절할 수 있게 해주는 어노테이션
4. 캐시를 사용할 메서드에 @Cacheable 추가하기
4-1. 데이터 읽기
// @Cacheable : 이 메서드의 결과는 캐싱이 가능하다
// cacheNames: 적용할 캐시 규칙을 지정하기 위한 이름, 이 메서드로 인해서 만들어질 캐시를 지칭하는 이름
// key: 캐시 데이터를 구분하기 위해 활용하는 값
// return값을 Controller로 반환하기 전에 캐시로 보내준다.
// 캐싱 전략 : Cache-Aside
@Cacheable(cacheNames = "itemCache", key = "args[0]")
public ItemDto readOne(Long id) {
    log.info("read One: {}", id);
    return itemRepository.findById(id)
            .map(ItemDto::fromEntity)
            .orElseThrow(() ->
                    new ResponseStatusException(HttpStatus.NOT_FOUND));
}
@Cacheable (Cache Aside 방식)
처음에는 메서드를 실행해서 결과를 가져오고,
해당 반환값을 캐시에 저장한 뒤
캐시가 삭제되기 전까지 메서드를 실제로 실행하지않고 캐시에서 데이터를 반환한다.
Cache Aside 방식
Lazy Loading이라고도 하며, 데이터를 조회할 때 항상 캐시를 먼저 확인하는 전략이다.
캐시에 데이터가 있으면 캐시에서 데이터를, 없으면 원본에서 데이터를 가져온 뒤 캐시에 저장한다.
❗단건 조회시 TTL은 줄이고 TTI를 설정하여
자주 조회되지 않는 데이터는 캐시에서 빠르게 제거하고
자주 조회되는 데이터는 캐시에 유지할 수 있다.
@Configuration
@EnableCaching
public class CacheConfig {
    @Bean
    public RedisCacheManager cacheManager(
            RedisConnectionFactory redisConnectionFactory
    ) {
        //기본
        RedisCacheConfiguration configuration = RedisCacheConfiguration
                .defaultCacheConfig()
                .disableCachingNullValues()
                .entryTtl(Duration.ofSeconds(120))
                .computePrefixWith(CacheKeyPrefix.simple())
                .serializeValuesWith(
                        SerializationPair.fromSerializer(RedisSerializer.java())
                );

        //단일캐시
        RedisCacheConfiguration individual = RedisCacheConfiguration
                .defaultCacheConfig()
                .disableCachingNullValues()
                .entryTtl(Duration.ofSeconds(5))
                // 5초 이내에 다시 조회되는 캐시는 5초가 지났다고 바로 삭제 되지않고 5초를 다시 세게끔 만들어준다.
                .enableTimeToIdle()
                .computePrefixWith(CacheKeyPrefix.simple())
                .serializeValuesWith(
                        SerializationPair.fromSerializer(RedisSerializer.json())
                );

        return RedisCacheManager
                .builder(redisConnectionFactory)
                .cacheDefaults(configuration)
                //itemCache라는 이름의 캐시만 individual로 진행됨
                .withCacheConfiguration("itemCache", individual)
                .build();
    }
}
5. 데이터 생성
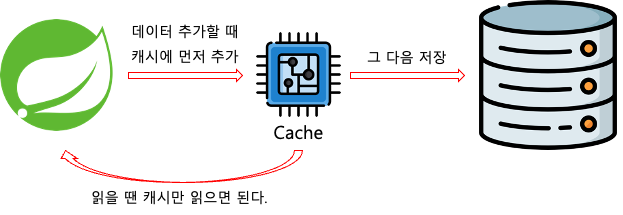
// 캐싱 전략 : Write-Through
@CachePut(cacheNames = "itemCache", key = "#result.id")
public ItemDto create(ItemDto dto) {
    return ItemDto.fromEntity(itemRepository.save(Item.builder()
            .name(dto.getName())
            .description(dto.getDescription())
            .price(dto.getPrice())
            .build()));
}
@CachePut (Write Through 방식)
항상 메서드를 실행하고 결과를 캐싱한다.
Write Through 방식
데이터를 작성할 때 항상 캐시에 작성하고, 원본에도 작성하는 전략이다.
6. 데이터 업데이트
// 업데이트 후 기존 가격 캐시 삭제
@CachePut(cacheNames = "itemCache", key = "args[0]")
@CacheEvict(cacheNames = "itemAllCache", allEntries = true)//itemAllCache로 시작하는 모든 캐시 삭제, 키 지정 key = "'readAll'"
public ItemDto update(Long id, ItemDto dto) {
    Item item = itemRepository.findById(id)
            .orElseThrow(() -> new ResponseStatusException(HttpStatus.NOT_FOUND));
    item.setName(dto.getName());
    item.setDescription(dto.getDescription());
    item.setPrice(dto.getPrice());
    return ItemDto.fromEntity(itemRepository.save(item));
}
@CacheEvict
주어진 정보를 바탕으로 저장된 캐시를 삭제한다.
아이템이 업데이트 되었으니 기존 정보를 갖고있는 캐시는 유효하지 않다.
7. 데이터 삭제
 // 삭제될 경우 단일 캐시, 전체 캐시 전부 초기화.
@Caching(evict = {
        @CacheEvict(cacheNames = "itemCache", key = "args[0]"),
        @CacheEvict(cacheNames = "itemAllCache", allEntries = true)
})
public void delete(Long id) {
    itemRepository.deleteById(id);
}
오늘의 tmi)
🤔